Overcoming Rendering Issues in Outlook
The world of email marketing is one filled with challenges. Whether your engagement has suddenly dropped, you’re having issues with deliverability, or your bounce rate has suddenly increased. There is rarely a dull moment. To add to these common hurdles, popular email clients such as Outlook have been throwing some added challenges our way with rendering issues.
In particular, one problem clients have run into is bullet points disappearing in certain versions of Outlook.
In HTML, bulleted lists are traditionally written with the tag followed by a series of tags for each bullet point:
<ul style=”padding-left:20px; font-family: Arial, Helvetica, sans-serif; font-size: 12px;
line-height: 18px;”>
<li>Bulleted Item 1</li>
<li>Bulleted Item 2</li>
<li>Bulleted Item 3</li>
<li>Bulleted Item 4</li>
</ul>
Across most email clients, the bulleted HTML list from above will render like this:
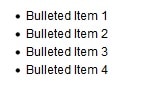
However, in Outlook the bullet points rendered like this:

Outlook can sometimes ignore bulleted lists altogether and the bullets themselves will sometimes disappear from the email, showing only the text of the bulleted items. This doesn’t happen every time, and while the root cause for this problem isn’t known, there is a workaround to ensure your bullet points look beautiful no matter the version of Outlook.
So How Do We Fix This to Render Nicely in Outlook?
The best option is to use a nested table with character encoded bullet points or images.
How to use a Nested Table:
In the cell housing the bulleted items, you will need to add a nested table, transforming the code from below;
<tr>
<td align=”left” valign=”top”>
<table border=”0” cellpadding=”0” cellspacing=”0” width=”600”>
<tr>
<td valign=”top”> <ul style=”padding-left:20px; font-family: Arial, Helvetica, sansserif;
font-size: 12px; line-height: 18px;”>
<li>Bulleted Item 1</li>
<li>Bulleted Item 2</li>
<li>Bulleted Item 3</li>
<li>Bulleted Item 4</li>
</ul> </td> </tr>
</table>
</td>
</tr>
To this:
<tr>
<td align=”left” valign=”top”>
<table border=”0” cellpadding=”0” cellspacing=”0” width=”600”>
<tr> <td valign=”top”>
<table cellpadding=”0” cellspacing=”0”>
<tr> <td>
<ul style=”padding-left:20px; font-family: Arial, Helvetica, sansserif;
font-size: 12px; line-height: 18px;”>
<li>Bulleted Item 1</li>
<li>Bulleted Item 2</li>
<li>Bulleted Item 3</li>
<li>Bulleted Item 4</li>
</ul> </td> </tr>
</table>
</td>
</tr>
</table>
</td>
</tr>
Once your nested table is in place, you will then need to create four rows with multiple cells.
The first cell should be padding between the bullet point and the left side of the content, the second will house the bullet point itself – whether character encoded or an image – the third cell will again be padding between the bullet point and text, and another cell will house the text.
A fifth cell is an option to have as padding between text and the right side of the content. Be sure to keep the properties within this table as well.
The code will then look like below:
<tr> <td align=”left” valign=”top”> <table border=”0” cellpadding=”0” cellspacing=”0” width=”600”> <tr> <td valign=”top”> <table cellpadding=”0” cellspacing=”0” style=”font-family: Arial, Helvetica, sans-serif; font-size: 12px; line-height: 18px;”> <tr> <td width=”20”></td> <td width=”5” align=”center”>•</td> <td width=”15”> </td> <td width=”540”>Bulleted Item 1</td> <td width=”20”></td> </tr> <tr> <td width=”20”></td> <td width=”5” align=”center”>•</td> <td width=”15”></td> <td width=”540”>Bulleted Item 2</td> <td width=”20”></td> </tr> <tr> <td width=”20”></td> <td width=”5” align=”center”>•</td> <td width=”15”></td> <td width=”540”>Bulleted Item 3</td> <td width=”20”></td> </tr> <tr> <td width=”20”></td> <td width=”5” align=”center”>•</td> <td width=”15”></td> <td width=”540”>Bulleted Item 4</td> <td width=”20”></td> </tr> </table> </td> </tr> </table> </td> </tr>
*NOTE: Because we’re using nested tables, we’ve removed the 20 pixel “padding-left” property to the nested table and instead made the first cell 20 pixels wide for padding. Also, the previous container table is set to 600 pixels, this is the reason the nested table has been built to this width.
Want Larger Bullet Points?
If you’re looking to increase or decrease bullet point size, add a span style around the bullet point. If you want to have the bullet point be larger or smaller, simply adjust the font-size to what you prefer. Please note that the larger the font size, the larger the line-height.
<td width=”5” align=”center”> <span style=”font-size: 20px;”>•</span> </td>
Outlook 2013 Adding an Extra Bullet Point or Number in Your Lists?
One well-known problem of Outlook 2013 in particular is that it’s not uncommon to see an extra bullet point or number in your list despite having properly closed tags and followed HTML best practices. Should you run into this problem, this workaround will also work for Outlook 2013’s issue. Build your nested tables and in place of the bullet point or image, simply use the corresponding number of your list.
If you would like help with your email HTML, to send more emails with less effort, and build audience relationships that last. Book a demo today.